Most people who tell me their robot vacuum was a waste of money are running the same broken robot vacuum routine. They map the house once, watch the machine bump into a chair leg, and then quietly stop emptying the bin. The robot keeps running on schedule. The floors stop getting cleaner. Nobody notices for three weeks.
I have run robot vacuums in every floor plan I can think of, from 4,000 square foot houses to a 600 square foot apartment with two cats and charging cords everywhere. The pattern never changes: the machine is rarely the problem. The routine is. A robot vacuum is a maintenance tool, not a maid. It keeps floors at 80% so you only do the last 20%.
This guide is the operating manual for the unit you already own. It covers the setup you do once, the habit you do daily, the maintenance you do weekly, and the caveats nobody puts on the box. It is not a buying guide, and it is not a feature list to scroll through.
Why you should trust me
I have cleaned houses professionally for nine years. What started as solo work turned into a five-person team that services more than 40 homes a week, and every one of those homes has a floor I have either vacuumed by hand or handed to a robot.
I keep a drawer of robot vacuums that looked promising on a showroom floor and failed on a job site. That drawer is the reason I test every unit for a full month in real homes before I recommend it to a client, and the reason I care more about what is in the dustbin after a week than what is printed on the box.
The metric I trust is the mess index: what is actually left in the bin after a scheduled run. A robot that fills a bin with real dust and hair is working. A robot that comes back with a puff of lint and a clean-looking floor has been skating around your rugs. The bin is the truth. The mapping app is a toy.
How I picked and how I tested
This article is about process, so the testing criteria are the process. When a new unit lands on my bench, it goes through the same month of checks:
- The bin test: a full week of scheduled runs, then I open the bin and look at what it actually collected.
- The rug test: a low-pile rug with a lip, because if a robot cannot handle a rug transition, it cannot handle your house.
- The cord test: obstacle avoidance is only as good as its worst run, and cords are what robots eat.
- The app test: I set a schedule, force a firmware update, and see whether my map and schedule survive it.
- The edge test: how close the machine gets to the baseboard, and how much of that strip is left for me.
Those are also the questions you should ask about any unit you are considering. A listing page tells you bin volume, dock type, brush design, and app features. It does not tell you what your specific floor plan will do to the machine. Read the listing for the hardware, then run the routine below.
What the routine runs on
The unit this guide is built around is below. Whether you already own it or you are about to, the routine is the same.
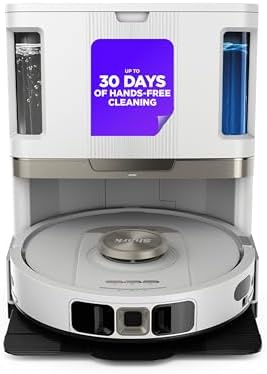
The floor machine: Shark AI Ultra Robot Vacuum, Black/Silver, AV2511AE
 Visit on Amazon →
Check current Amazon price on the listing, then check the four things that decide how much daily work lands on you: bin volume, whether the unit ships with a self-empty dock, the brush roll design, and whether the app supports saved maps and no-go zones. Those four items decide whether you are emptying a bin daily or a sealed bag every few weeks, and whether the machine rediscovers your house on every run.
I am not going to quote you suction numbers or cleaning scores here, because the honest answer is that your floor plan decides more than the spec sheet does. Go read the hardware numbers on the product page. Use this guide for the routine around them.
Flaws but not dealbreakers: No robot gets everything. The strip along the baseboard, the corners, the stairs, and the space under the kitchen cabinets are yours. Budget five minutes with a handheld or a broom on the day you deep clean, not every day. Anyone with mostly hard floors and low-pile rugs will get the most out of a daily schedule. If your house is wall-to-wall high-pile carpet, set expectations accordingly.
The two-minute habit that keeps the routine alive
This section is not robot gear, and I am not going to pretend it is. But every routine I have watched collapse collapsed for a human reason, not a mechanical one. The robot runs, the person stops caring, and the bin sits full for a week.
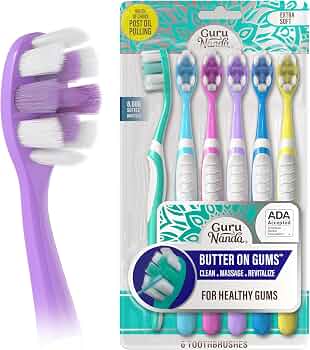
The daily reset brush: GuruNanda Butter On Gums Toothbrush, ADA Accepted Manual Toothbrushes with 8000+ Ultra Soft Softex Bristles for Sensitive & Receding Gums, Perfect for Whiter Teeth, Assorted Colors, 6 Ct
 Visit on Amazon →
Check current Amazon price. The listing describes it as ADA Accepted, with 8000+ ultra soft softex bristles built for sensitive and receding gums, sold as a six count in assorted colors.
Here is the tie-in, and it is a real one. The habit that makes a robot vacuum routine stick is stacking it against something you already do every day. My version: the robot starts in the main room at the same time I do the two-minute bathroom reset. Brush your teeth while the floors get done, and neither task feels like a chore you added to the day.
A six-pack also solves a maintenance problem people ignore. Toothbrushes, like robot filters and brush rolls, are consumables with a replacement schedule, and you actually replace them on time when a fresh one is already in the drawer. Six brushes in assorted colors also means nobody in a shared bathroom grabs the wrong one.
Flaws but not dealbreakers: Ultra soft bristles are not for everyone. If your dentist told you to use a medium bristle or a powered brush, follow your dentist, not a floor-cleaning article. This is a habit tool, not a dental recommendation.
The actual routine, step by step
This is the part that matters. Do it once, then let the schedule do the work.
Step one: clear the floor before the first run, not after. Cords, socks, pet bowls, the dog's rope toy, the charger cable behind the couch. Everything a robot can eat goes up before the machine ever starts. Robots that eat charging cords are the number one cause of "my vacuum broke" messages I get, and it is almost always a cord the owner forgot about.
Step two: run a mapping pass on a clean floor and save the map. Mapping a floor covered in clutter gets you a map of your clutter. Clear the room, let the machine do a full pass, then name and save the map. If your app supports no-go zones, draw them now, while you still remember where the problem spots are.
Step three: test the rug transition on day one. Watch the machine hit the edge of your rug. If it climbs it, good. If it stalls, folds the corner, or gives up and turns around, fix the rug, not the robot: rug tape, a better pad, or a lower-profile runner in that doorway. If it cannot handle a rug transition, it cannot handle your house, and no app setting will change that.
Step four: pick a run time tied to an existing habit. The best schedule is one you do not have to remember. Mine runs while I brush my teeth. A client's runs when she leaves for school drop-off. Tying the run to something you already do daily is the single biggest predictor of whether the schedule survives month two.
Step five: empty the bin after every run and look at what is in it. This is the mess index, and it takes fifteen seconds. Real dust and hair means the machine is doing the job. Nothing but fluff means it is time to check your schedule, your no-go zones, or your filters. And yes, every robot needs a bin-emptying habit. There is no such thing as set and forget.
Step six: stop touching the app. Set the schedule, save the map, then leave it alone. The app is great until a firmware update asks you to confirm something mid-run and resets your schedule. Check the app once a week, not once a day. If your unit has a self-empty dock, the only app task that matters is confirming the bag status.
Step seven: do ten minutes of maintenance a week. Flip the machine over. Cut hair off the brush roll. Wipe the sensors and the charging contacts. Clear the front wheel. Most "my robot got dumb" complaints are a hair-wrapped brush roll and a dusty sensor, not a software problem.
Step eight: put replacements on a calendar. Filters, brush rolls, and edge brushes have a service life. So do toothbrushes. Put all of them on the same monthly reminder, and buy the consumables before you need them, not after the machine starts leaving a dust trail behind it.
What this guide is not
This is not a robot vacuum buying guide, and it is not a robot mop guide. Combo units that mop and vacuum are a different conversation with different tradeoffs, and I would rather you learn one machine properly than half-learn two. If you are shopping, the criteria in the testing section above are what to take with you. If you already own a unit, everything above works today, without spending anything.
What this all costs
The routine itself costs nothing. The machine is the only real expense, and prices move constantly. Check current Amazon price on the listing rather than trusting a number in an article.
What I would budget is attention, not money. Fifteen seconds to empty a bin after each run. Ten minutes a week on the brush roll and sensors. Five minutes on the day you deep clean, for the baseboards and corners the robot cannot reach. Add the price of consumables, filters and brushes, spread across a year, and the cost per day is small enough that the real question is not whether a robot vacuum is worth it. It is whether you will keep the bin empty.
That is the whole job. Run it daily, empty it daily, maintain it weekly, and the floors stay at 80% without you thinking about it. The other 20% is you, a broom, and the corners. That is not a flaw in the machine. That is the deal.